Tip: Start typing in the input box for immediate search results.Can't find what you're looking for? Submit a support request here.
Nonlinear Events Overview
Introduction
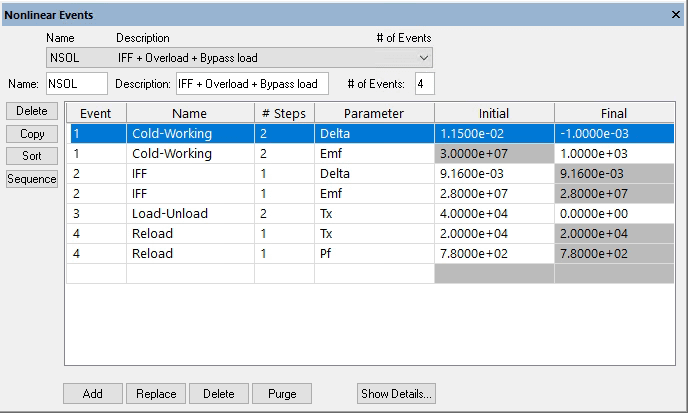
In order to solve material nonlinear analyses using Incremental theory of plasticity (ITP), at least one nonlinear event record must be defined in the Nonlinear Events dialog (Edit > Nonlinear Events).
- Nonlinear event records may include loading, unloading, and/or re-loading events, as well as changes to fastener element material properties, fastener element interference, etc.
- Each nonlinear event requires a parameter of Class “B.Cond.” be selected in the “Parameter” column.
- Steps may be allocated within each nonlinear event to increment one or more parameters from its initial to final value.

Note: to modify the font properties of the Nonlinear Events table columns, right-click on any column label and then click “Select Font…”.
Defining a Nonlinear Event Record
To define a nonlinear record proceed as follows:
- Under “Name:” provide a name for the nonlinear solution, for example NLSOL (do not use “_” as part of the name as it is a reserved symbol). Once all the nonlinear events are defined, the name will appear in the “Nonlin ID:” drop down combo on the Nonlinear tab of the Solve dialog. If several nonlinear solution records exist, then the one to be used for the analysis has to be selected from the “Nonlin ID:” drop down combo.
- The “Description” field can be used to enter a short description that is relevant for the current analysis (this field is optional).
- Under “Number of Events” enter the total number of events associated with the nonlinear solution. Note: the number of events has to be less or equal than the highest Event number.
- In the “Event” field, using the up and down arrows, select the order in which the load events will be applied (i.e., 1 for the first event, 2 for the second, etc.). Use the event “Name” to provide a descriptive name for the given load event (e.g. Axial loading, Unloading, etc.), or leave it blank (this field is optional).
- For a given load event the “# Steps” field indicates in how many steps the load will be applied from its initial value to its final value in equal intervals.
- The “Parameter” drop down combo allows the user to select the parameter that is associated with the load to be modified for a given load event. Only parameters defined as Class: “B.Cond.” in the Parameters pane can be selected from the drop down menu (the parameter class can be changed after computing the linear solution, if necessary). Furthermore, the selected parameter cannot be a dependent parameter neither a geometric parameter. More than one parameter can be selected for a given load event, however when dependency between parameters can be defined, it is suggested that only the driver (or controlling) parameter be defined as “B. Cond.” All dependent parameters will be updated automatically during the iterative procedure.
- “Initial” refers to the initial value assigned during the definition of the parameter and used for the linear solution. This value is displayed grayed out as it cannot be changed for the first load event.
- “Final” refers to the final value of the parameter. If only a single load step is selected, then as this value will be the same as the initial value and can not be changed is shown grayed out.
- Once a parameter has been selected from the available ones on the Parameter dropdown a new entry line is generated that can be used for a new event or to add another parameter to be modified within the same event (Note that the event number is automatically increased). Alternatively, the “Copy” button can be used to create a new event entry with the same information than the selected event. The “Delete” button at the upper left, can be used for deleting an unwanted event. The “Sort” button sorts the event numbers without checking for gaps and updates the display on the nonlinear events interface. The “Sequence” button, sorts the event numbers checking for gaps and will query the user if he wants to automatically remove the numbering gaps by renumbering (in ascending order) the events number (it will not add or replace the existing record).
- Once all the nonlinear events are entered, click on the “Add” button to add the nonlinear event record.
- Show Details button: All the information entered in the nonlinear event interface can be retrieved in a (separated) table containing detailed information for each event step, such as the run number, the event name, the parameters that are modified and their value for the particular event step, and whether the event is active or not (e.g. If there are 3 events defined and the number of events is set to 2, the last event will be inactive). The button will be active when the event record is created (or selected).
For an example of creating nonlinear events to simulate a cold working process in both 2D and 3D, refer to StressCheck Tutorial: 2D vs 3D Cold Working Analysis of a Close Edge Distance Hole.
A Note on Nonlinear Events with TLAP Scaling Parameters

- Nonlinear Event records may be used to drive the scaling of imported Total Load At a Point (TLAP) records for use with ITP analysis.
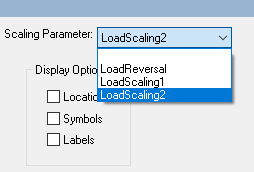
- First, a scaling parameter of Class “B. Cond.” must be defined by the user. This scaling parameter is then paired to a specific TLAP case from the Point Load Case Definitions dialog (via Edit > Point Load Info… from the Main Menu).
- Then, a Nonlinear Event record which modifies the value of this scaling parameter will directly control the magnitude of the TLAP Case associated with the scaling parameter. The TLAP entries are scaled linearly such that the individual force and moment components are uniformly multiplied by the current value of the scaling parameter.
Modifying/Deleting/Purging Nonlinear Event Records
- If a record has to be modified, select it from the pull-down list and modify the appropriate fields, then click on the “Replace” button to update the record.
- The “Delete” button at the bottom of the dialog box can be used for deleting an unwanted record (has to be selected first), while the “Purge” button deletes all load event records.
 Serving the Numerical Simulation community since 1989
