Tip: Start typing in the input box for immediate search results.Can't find what you're looking for? Submit a support request here.
Solution ID Overview
Assignment of Solution ID’s in StressCheck
To assign solution ID’s to a StressCheck model, select the Solution ID tab in the Input dialog, then the Solutions subtab and specify a solution ID name in the Solution ID: box. Because StressCheck allows more than one load case and constraint case to be defined, it is necessary to associate a unique solution ID name with each desired constraint and load name pair.

Adding a New Solution ID
After entering a solution name in the Solution ID: box, select a constraint ID and load ID from the Constraint Records and Load Records lists, respectively. Click on the Accept button and the solution, constraint, and load names will appear in the record listbox directly under the C/A/O/M combo-boxes at the top of the Solutions subtab.
When an analysis is executed, StressCheck will run any active solution ID’s. A solution ID is active if the checkbox next to Solution ID: is checked.
Inactivating a Solution ID
You may disable a solution ID record by simply turning the check box off next to the Solution ID: box. Select the desired solution ID record from the record listbox (the Status will be marked as “Selected” to indicate the record is actively being edited), enable or disable the check box, then click Replace.
Editing a Solution ID
You may modify a solution ID by selecting the desired solution ID record from the record listbox (the Status will be marked as “Selected” to indicate the record is actively being edited), modify the solution ID name, load ID, and/or constraint ID, then click Replace.
Deleting a Solution ID
To delete a solution ID record, select the desired solution ID record from the record listbox (the Status will be marked as “Selected” to indicate the record is actively being edited) and then click the Delete button.
Removing All Solution ID’s
To remove all solution ID records, click the Purge button.
Defining Solution Configurations
Model variations can be incorporated into the same model by using Parts and by creating Solution Configurations which define which boundary conditions (i.e. solution ID’s defined in the Solutions subtab) should be applied to which model variation.

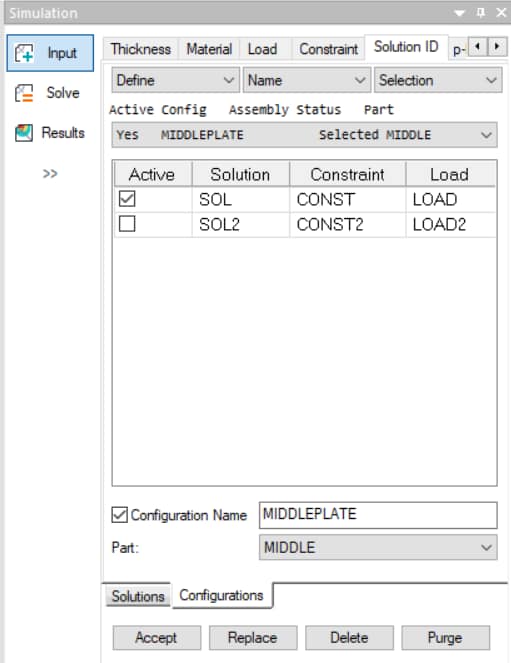
To define Solution Configurations, select the Solution ID tab in the Input dialog, then the Configurations subtab and specify a Solution Configuration name in the Configuration Name: box. Then, select the appropriate Part definition from the Part: combo-box and activate the solution ID record(s) displayed in the table that are appropriate for this Solution Configuration. Figure 3 shows an example Solution Configuration definition (“MIDDLEPLATE”) where the Part “MIDDLE” is to be solved for Solution ID “SOL”:

Click Accept to add the solution configuration record to the record listbox directly under the C/A/O/M combo-boxes at the top of the Configurations subtab.
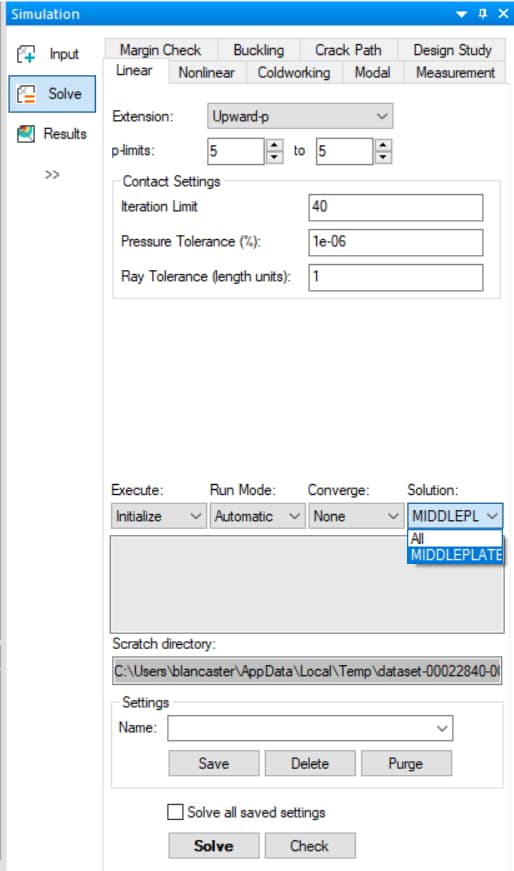
After defining the Solution Configurations, you are ready to solve your model variations. Figure 4 shows the Solution: option in the Linear tab when at least one Solution Configuration is available:

You may choose whether to analyze all available Solution Configurations (“All”), or to select a particular Solution Configuration for analysis (e.g. “MIDDLEPLATE”). Since each configuration uses a unique solution ID, you can save solutions for all model variations in the same database if you choose All, and post-process them all without having to solve them separately and post-process them separately. This makes comparison of model variations more convenient.
Post-Processing Solution Configurations
The following defines the expected behavior when post-processing solution configuration results:
- If there is no Solution Configuration defined, or the solved Solution Configuration references “All Objects”, the Parts selector defaults to “All Objects” when the associated solution ID is selected/currently active in post-processing.
- If there is a Solution Configuration defined, and that Solution Configuration is solved, the “Part:” selection for that Solution Configuration will be reflected in the Parts selector when the associated solution ID is selected/currently active in post-processing.
For an example of using parts and solution configurations to solve a 3D automeshed model, refer to StressCheck Tutorial: Parts and Solution Configurations Part 2 – 3D + Automesh.
For more information on solution configurations, refer to What Are Some Tips & Tricks for Using Parts and Solution Configurations?
 Serving the Numerical Simulation community since 1989
